Photography Techniques, Skills & Tips
Updated April 15 2001
|
Index:
Getting Exposures RIGHT (Understanding the Histogram) Controling Mixed Lighting on Location Get a Tripod
|
ExposureA couble of ground rules DO apply, keep in mind that each channel (Red, Green, and Blue) have 255 levels, if you exposure gets any hotter than 255 there is no way back. This is something I had to get used to, because negatives can handle being "hammered" a little and it is still possible to print perfect images from them, as a matter of fact, we often prefer to overexpose beauty and fashion images to get nicer skin tones. However in the digital world it helps to keep the lighting slightly "flatter" with less contrast, and then add the last pop in Photoshop. One important Digital Exposure tool is the histogram on the back of your digital camera, it shows you where the expsure really is at, if it is hot or dark, this helps reviewing images in daylight when you can not entirely see the wuality of the image on the monitor. |
AEL Auto Exposure Lock"The button on the top right side under the main dial" This is a quick way to lock the exposure while shooting, you have probably noticed how the exposure changes wile you move your camera to compose a picture. Press the AEL button to lock the exposure. You can take as many pictures as you like with the same exposure, as long as you keep the AEL pressed. Say you are shooting a person with a strongly lighted
background, the result would normaly be that the person would become
dark, because the camera naturally will try to expose the background
correctly. Zoom in to the face of the person, let it fill the picture
frame, then press the AEL, zoom back out and take the picture. The expsure
is now locked to the correct exposure for the persons face. It will
be that way for as long as you keep pressing the AEL button. The AEL is a very handy and useful feature, it have been part of modern cameras since the first cameras with "Auto Exposure". I highly recomend playing with it, because like all features, they only works when you know how they work and use them. Note. The AEL do not lock the focus, if you want to capture a series of images whithout changing the focus, but generally prefer to use the automatic focus, point at the object, press the shutter half way down until you have focus lock, then flip the focus lever,on the left side of the camera, to manual focus. That is it, as long as you do not touch the focus ring you are fine. Remember that if you turn your camera off and back on, the camera will reset the focus and you will have to focus again. |
|
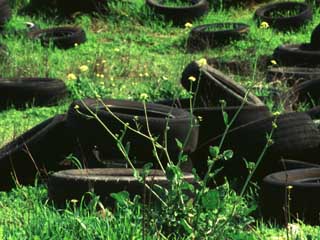
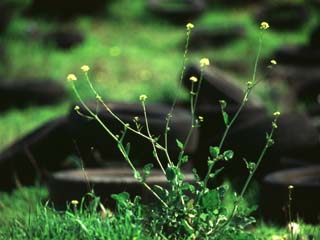
Depth of Field One of the powerful tools of your lens is the Depth of Field, it can be used to keep things sharp and also isolate something from the background. Take this image as an example, I captured it at a tire "graveyard", the picture really is about a lonely flower in all the tires. The first frame was shot at F. 11 but at this aperture it is really hard to see, in fact, it is almost hard to make out what I am looking at. In the second picture I opened up wide to f. 2.4. Notice how the "flower" in the foreground now are jumping out of the image while it is still possible to see the tires in the background, but now they are more texture and supports the front image . |
|
|
The Trick here is to use the aperture to "show" what you want the viewer to see in the image. Say you are shooting a landscape, then you are likely to want to show all of the landscape, and a "small" apertures like f. 11 is great, it is going to show with great sharpness all the details of the landscape. However for a portrait, I prefer to use a wide open lens, then focus on the eyes so that they are nice and sharp (after all, the eyes are the door to the soul, and probably the most important part of a portrait.). The wide open aperture keeps the background out of focus and prevents it from distracting from the main object in the portrait. On the Olympus e-10 you can easy do this by selecting the "A"
Setting. First rotate the dial so that you get a f.2 take a picture,
then rotate the dial the other way until you your get f.11 take another
picture. |
|
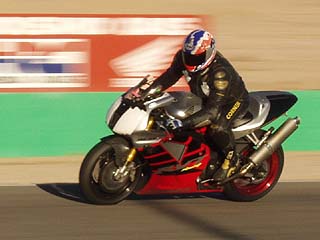
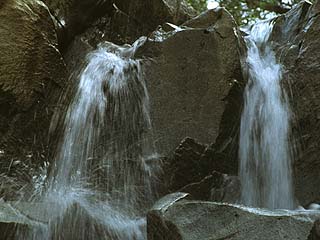
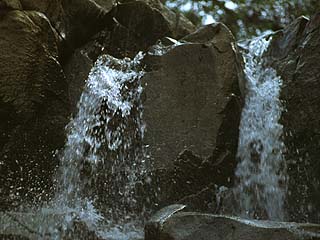
Shutter Speed The Shutter Speed you pick not only limits the amount of light which will reach the film durring the exposure, but also mow much a object might move in the time the exposure take. Well, yeah it DOES take time, some times it can feel painfully slow if there is little light and moving objects in the picture. Most of the time we are in charge, like in these pictures, In the first sample with the motorcycle I wanted to get a feeling of speed, I used 1/100th you can tell how the lines in the background tells you that the motorcycle is moving, but I really wanted much more motion, and in retrospect I should have used something like 1/40th. that would have gotten me more blured pictures, but the good ones would have had LONG streaks of color in the background, making them look like they were going like rockets. In the pictures with the little "water fall", you can really tell the difference between shutter speeds, the one was shot at 1/15th of a sec. and you can see how the water is making long soft steaks. The other image is shot at 1/250th and is even at this slow speed already freezing the drops in the air.
|
|
| f. stop and Shutter spe. It is worth noting that the aperature and the shutter speed is linked togehter. The scale of "f" stops, correspond to the shutter speed settings. each whole stop matches a shutter speed setting, so if you are shooting at f.8 1/30th and want freeze the action a little more, you can change to f.5.6 1/60th or f.4 1/125th. Each stop either doubles or cut the light in half, If you go from f.8 to f.5.6 you get twice as much light hitting the film (or the CCD) in the same period of time. |
© 2001 - 2005 by Bo Lorentzen All Rights
Reserved