Updated November 18th 2004
 |
|
Outstanding Prints requires excelent exposures. You alread have found the lightmeter, and it works much like your old camera, not much confusion here. However digital cameras, such as the Olympus e-10 Digital SLR, offers a very powerful new way of checking the exposure of your images. The build-in Histogram, shows you the accurate amount of light and dark pixels in your picture. Represented in a easy to understand graphic display. This is a tool which have never before been available to photographers on location. This is also one of the features there seems to be the most confusion about. There are two ways you can access and use this feature. 1. After the fact. put your camera to playback, then when the image comes up, press the "INFO" button below the display to the left. This will display the histogram. 2. While you are working. After the camera is done saving the picture, press twice quickly on the display button, this will temporarly put the camera into playback mode, then press the "INFO" button. Note, way of getting to the playback mode temporary only, if you tap the shutter the camera will switch back to shooting mode, this means that the camera is ready to go, if something happens while you review a picture, just point and shoot, you are not missing any action using this feature. |
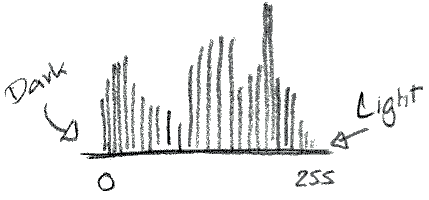
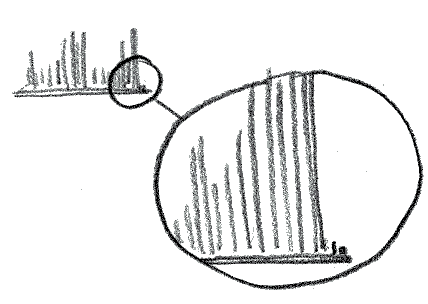
| The histogram shows you the number of pixels having a particular
lightness value in your picture. The position of the vertical bar right
to left shows you how light or dark it is, the height shows you how many
pixels have this particular density. Dark being RGB 0.0.0 and Light being 255.255.255. |
 |
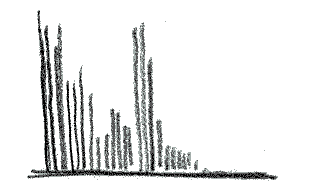 |
A perfect exosure looks something like the histogram above, there is a even distribution of data across the entire histogram, this means even data from light to dark. To the left you see a underexposed picture, note how most of the bars are on the dark side of the histogram. This tells you there are no bright pixels in this picture, if you print it, the lightest areas are going to be greyish. |
|
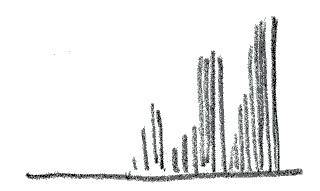
To the right is a typical overexposed image. Notice
how the data is blocking all the way to the right, lots of image data
is squized together in the light range, with nothing in the dark areas.
Close your apperature, or select a faster shutterspeed to darken the
image and spread the data over the entire dynamic range of your exposure.
|
 |
 |
Here is a final point to keep in mind when evaluating a exposure. I try to always keep all data inside the histogram, and like to check that there is a little space on each end, just one or two bars clearence, just to make sure that I am not loosing important data from the image. |
|
Dark being RGB 0.0.0 and Light being 255.255.255. is technically possible, however most printers can not reproduce the extreeme values. This is why I prefer to keep the ends of the image slightly clear of the extreems if I can get away with it, though I ONY do mean SLIGHTLY, you want to being a blue sky as close to the end of the histogram as you can without blowing past the end. Keeping the data a little to the left of the end, ensures that you have data and smooth gradients in the sky, if you run into the end, you will get a large flat area in your sky where it ran into the limit of the image. If you were shooting something with a dark saturated sky, you would see the sky represented as a number of tall bars, further away from the light end of the histogram, the darker the sky gets, the further the bars move to the left. |
© 2001 - 2005 by Bo Lorentzen All Rights
Reserved